This might be a video of the figs. This is a test to see if I can post to this old blog from my phone using videos
Sunday, October 2, 2022
Saturday, February 9, 2013
Pantry Supper
We've all experienced those days when the energy for hunting and gathering just isn't there. Even if Kroger is a whopping 2 minute drive. Yesterday, I had one of those days.
I fell asleep in the driveway. (Mom: Put down the custody paperwork.The car wasn't moving.) The boy said, "Keys, please," and ran into the house, while I was gently lulled into relaxation by the residual heat from the seat warmer. Twenty minutes later I woke with a very stiff neck (Aren't headrests supposed to support heads? Grrr.) and an "I'm not shopping" attitude. Time for a combination "Pantry Supper" slash "Clean out the Fridge" kind of meal. (Pizza night is another remedy for this attitude, btw, but I had already played that card several nights before.)
In other news, I'm completely enamored with Vine, the new video-sharing app from Twitter. I've been telling stories in 6 seconds with moving pictures (Follow me -- I'm using the name Jennifer Burchett, just like I do in real life.) And in the spirit of moving pictures, here is a slideshow of our Pantry Supper.
Click on this and then click on the arrow to begin. (Or click here and scroll through the set, because some devices play a random slideshow without my fun captions. Ah technology!)
Enjoy!
Thursday, January 24, 2013
Don't Hide the Veggies!
Have you read those cookbooks that teach you how to sneak healthy vegetables into yummy, kid-friendly dishes? I haven't. I didn't buy it. And I don't buy it.
I want my child to know what a red pepper tastes like (he loves them). And broccoli (not so much) (yet). How does sneaking them into brownies develop healthy, life-long eating habits? Besides, if I want to lie to him, I'll just tell him that Nutella is healthy.
Perhaps the boy's vegetable repertoire isn't all that extensive, but at least they are real, whole foods. That he enjoys. On purpose.
Back in the Cafe Jennifer days, we would occasionally put a little bowl of marinated cucumbers and sweet onions on the table as guests arrived. An Appalachian amuse-bouche, if you will. This is a very simple presentation -- one of those 3 ingredient quickies. (I'm really only blogging about it so I can share my opinion about the whole sneaky veggie travesty.) I skip the onions for the boy, and cut the cukes into a more whimsical shape than we did at the restaurant, but if I set a bowl of these cucumbers on the counter as I'm making dinner, they are gone before we sit down to eat.

Scrub them well. With a vegetable peeler, cut away stripes from the peel. This way there's enough peel to preserve the crunch, but not too much for finicky kids with small vegetable repertoires.
Mix together 3 Tablespoons sugar, 1/3 cup white vinegar, and 1/4 cup cold water.*
(Don't freak out about the sugar; most of it stays in the bowl. Remember, this is a marinade!)
Stir it a bit to help the sugar dissolve.

Slice the cucumbers in half long-ways, and scoop out the seeds. (A grapefruit spoons works like a charm, though it isn't too difficult to begin with :-) )
Then I slice them across, into little striped half moons.
I think you could take it from here, but I will add one more note: If you have time to pop the marinating cukes in the fridge for about 10 minutes, the crunch factor goes up a notch. But, if there is a hungry boy staring at you while you make these, *reduce the water a little and add an ice cube or 2.
Eat your veggies!

Saturday, September 17, 2011
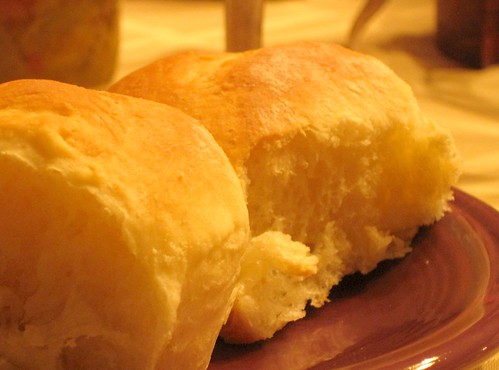
Yeast Rolls with Sally Weisenberger
Savory...
Or sweet?
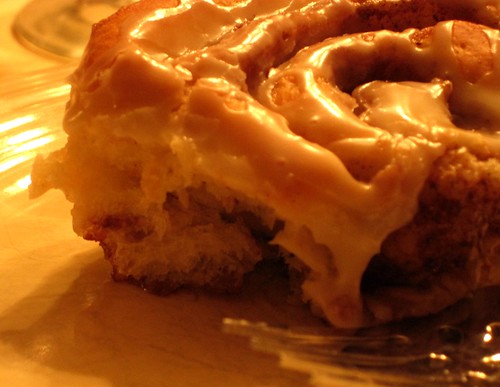
You decide.
I had the good fortune to be invited to a "Christmas in July" party this summer. Yes this is a late post. (Not as late as you think because it was actually in August, but who has ever heard of a "Christmas in August" party? No one, that's who.)
Sally Weisenberger was our guest of honor, and she brought her famous yeast roll and cinnamon roll fixins... and starring at center stage, Kentucky Proud, was Weisenberger Mill flour, of course.
 Notice that sticker near the bottom? That tells us which Kentucky farm grew the wheat. If that doesn't stir up a locavore flame in your heart, then I give up on you.
Did I say this was health food? No I didn't. This is special occasion kind of stuff.
 Got Buttah?


 For Sweet rolls: Roll dough to about half an inch thick, spread melted butter, cinnamon and sugar, and roll up, jelly-roll style. Cut them about an inch wide, and place cut side down in -- yes, more melted butter.
Bake for 15 minutes, or until lightly browned. Ice with a powdered sugar glaze (with water or milk) and a touch of vanilla.
And for the dinner rolls:
 Dough is rolled out to half an inch
thick again, cut in circles, then folded
over and placed in a baking pan
with -- melted butter.
Mercy!
Thanks for having an August Christmas party Jackie!
(click here for more pics of the event)
And Sally, thanks for sharing this wonderful recipe. Without further ado, here it is:
(disclaimer: This is the first time I've posted anything containing shortening. This old-fashioned taste may be worth falling off the hydrogenated fat wagon.)
Or sweet?
You decide.
I had the good fortune to be invited to a "Christmas in July" party this summer. Yes this is a late post. (Not as late as you think because it was actually in August, but who has ever heard of a "Christmas in August" party? No one, that's who.)
Sally Weisenberger was our guest of honor, and she brought her famous yeast roll and cinnamon roll fixins... and starring at center stage, Kentucky Proud, was Weisenberger Mill flour, of course.
 Notice that sticker near the bottom? That tells us which Kentucky farm grew the wheat. If that doesn't stir up a locavore flame in your heart, then I give up on you.
Did I say this was health food? No I didn't. This is special occasion kind of stuff.
 Got Buttah?
Sally shared her Aunt Gladys Hutchison's cherished recipe, and we enjoyed both savory and sweet delights.


 For Sweet rolls: Roll dough to about half an inch thick, spread melted butter, cinnamon and sugar, and roll up, jelly-roll style. Cut them about an inch wide, and place cut side down in -- yes, more melted butter.
Bake for 15 minutes, or until lightly browned. Ice with a powdered sugar glaze (with water or milk) and a touch of vanilla.
And for the dinner rolls:
 Dough is rolled out to half an inch
thick again, cut in circles, then folded
over and placed in a baking pan
with -- melted butter.
Mercy!
Thanks for having an August Christmas party Jackie!
(click here for more pics of the event)
And Sally, thanks for sharing this wonderful recipe. Without further ado, here it is:
(disclaimer: This is the first time I've posted anything containing shortening. This old-fashioned taste may be worth falling off the hydrogenated fat wagon.)
Yeast Rolls
2 cups water
1 cup Crisco shortening
2/3 cup sugar
2 eggs
6 cups unbleached, soft wheat flour
1 TBL salt
2 TBL yeast
Boil 2 cups of water, add Crisco and sugar, mix and let cool (cool enough for the eggs)
Add the 2 beaten eggs and whisk to mix
Add this wet mixture to the dry -- flour, salt and yeast
Mix together (may use dough hook) -- dough will be wet
Cover in a plastic container and place in refrigerator for at least 4 hours, preferably overnight (make sure to use a large enough bowl which will allow the dough room to rise)
Take from refrigerator and on a floured surface, roll about 1/2 the dough at a time to a thickness of about 1/2 inch. Using a biscuit cutter, cut dough in circles and fold over once. Place in greased pans (grease with melted butter).
Cover and let rise until double (at least one hour).
Bake at 350 degrees for about 15 minutes or until lightly browned.
Yields 48-60 rolls, depending on size. These freeze well.
Monday, May 23, 2011
Green Garlic
 My husband was going to be on Southland Drive Sunday, so as he was leaving I asked him to stop by the Farmers Market and pick up a vegetable for dinner. I had everything else already, and he would save me a trip to the store. (I was on a roll with some much-procrastinated spring cleaning.)
 He comes home with green garlic.
I should tell you that my husband is "a lost ball in high weeds" (his phrase) when it comes to food shopping. He's also a financial planner, and the price was right. Normally $3 a bunch, the guy from Elmwood Stock Farm sold him 2 bunches for $2. How could he resist? (There's a good reason to go to the market late on Sunday, btw.)
Yes, it's a sign of spring. Yes, it's delicious. But as a side vegetable? I had always thought of it as an aromatic.
I had let my hair dry by itself, so there was no way I was going to leave the house. So...

 I chopped up the root ends, and let them sweat in 1-2 Tablespoons olive oil over med-low heat.
After about 5 minutes I coarsely chopped the greens and added them to the pan with some salt and pepper, and turned up the heat a bit.


I reserved some of the greens, minced them finely, and added them to buttermilk cornbread batter.

 When the green garlic was starting to brown, it was time to deglaze.
I poured in 1/2 cup of chicken stock and did the scraping thing.
I covered it, and let it simmer for about 5 minutes.
When I raised the lid, I discovered that most of the stock had been absorbed. I left the lid off a few minutes, to reduce further (didn't want it dripping) and finished it with the teeniest knob of butter. And speaking of reducing, one whole bunch doesn't amount to much at the end of the day. I should have done both of them -- it was our vegetable after all.

The cornbread was delicious, with a lovely infusion of garlic.

Baked flounder on a bed of green garlic.
I think I'll send Hubs out for vegetables again.
I think I'll send Hubs out for vegetables again.
Wednesday, May 4, 2011
Earth Day Project a la The Boy

The boy and I recently tried a roasted radish recipe from the nice folks at White on Rice.
His Earth Day project was "Eating Seasonally." In addition to video of Farmers Market interviews, his classroom project included a slideshow of the preparation of this dish. He allowed plenty of help uploading the slideshow, but insisted on collaborating on the captions:)
Enjoy the show!
PS: He chose to leave out the freshly ground pepper AMA. (Against Maternal Advice)
Posted using BlogPress from my iPad
Friday, November 13, 2009
Homemade Potato ...er, I mean Turnip Chips
 A couple of days ago, I picked up my son from school, and immediately upon climbing in (amid my usual, "Come on, there's a long line!") he excitedly hands me a note. Like most things he brings home from first grade, it's rolled or folded into the smallest package possible. Maybe he thinks that makes it easier to carry. I unfolded his note and read the precise school teacher handwriting which said, "Recipe for turnip chips?"
Hmm.
I had never actually made turnip chips before. It was time to ask the boy. It went something like this:
Me: Am I supposed to find a recipe for your class? Are you studying turnips?
Boy: My teacher wants the recipe you make. I told her about it.
Me: But I've never made turnip chips.
Boy: You know, the ones you make where some are really crispy and some are really soft, and they're really delicious. Those turnip chips.
(I must interject here. What mother doesn't glow when her son waxes poetic about a vegetable?)
Me: Oh -- you mean the potato chips I make?
Boy: Those are potatoes?
This went on a while, and we ended up deciding to roast some turnip chips. The original potato recipe isn't something I would have blogged about. It's not really even a recipe; I just slice potatoes and roast them. But here goes -- this is for the boy:
I peeled three turnips, and sliced them into rounds. I do this by hand for two reasons: I like the rustic look of irregular slices, and the way they cook up (that's what the boy meant when he said some were crispy and some were soft); and just looking at my mandoline makes my fingers instinctively curl up in self-preservation mode.
 I toss them in a large bowl with 3 Tablespoons olive oil, salt and freshly cracked pepper, and dried thyme. Any combination of dried herbs will work here. (Rubbed sage might be great this time of year, Herbes de Provence would be nice earlier in the season...go wild.) Use a large enough bowl to really throw them around. It's not a bad idea to reach in there with your hands and make sure all the slices are seasoned on both sides.
I spray a baking sheet with non-stick spray, and arrange the slices as evenly as possible. They will overlap a bit; just let them.

Roast them at 375 degrees. After about 15 minutes, rotate the baking sheet. After another 15 minutes, turn the "chips" over with a spatula, then roast 10 or 15 minutes more. They will shrink up quite a bit.

These chips don't quite make it to crispy. They are so absolutely delicious, however, that it doesn't matter. The slow-roasting brings out incredible sweetness and the caramelized edges develop a lovely chewiness. Now that I know how they behave with this treatment, I can't wait to fan them out over a serving platter and top them with grilled fish. Or roasted chicken. Or whatever.

Subscribe to:
Posts (Atom)